  |

| |
| How-to Resources | ||
Define & Configure | ||
Define & Configure
This section explains how to access the configuration for the different components used in the example, plus any specific tips. You should examine the configuration of each component in the downloaded example to see the detailed settings used.
The Basics
You must be logged in to access any configuration options. A reminder how to log-in...
All Components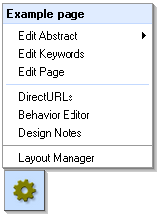
The floating-toolbox
The floating-toolbox is shown when you are logged-in with edit permission. The menu shown is context sensitive and changes depending on the Component.
Layout Manager will open the Layout Manager in a new window.
Design notes allow you to annotate your configuration as an aid to future reference.
DirectUrls allow you to set an alias as a friendly URL for the component to display in the address bar for aesthetic and SEO purposes.
Edit Page - allows you to edit the 'surface' of the Component.
Keywords - allow you to assign keywords.
Edit Abstract - each component has two additional hidden text surfaces that can be embedded.
Behavior Editor - accesses the graphical interfaces for Style (CSS), Settings and access Permissions. This tool is used in configuring every component. The options in the Settings section are context sensitive and change depending on the Component. Read more about the Behavior Editor.
Page component
You edit the Page component by mousing over the floating-toolbox and selecting 'Edit Page' from the context menu. The Page can be used either as a simple text surface or in combination with other embedded components.
Embedding components
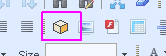
You embed components using the embed tool from the Text Editor.
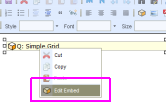
You can subsequently select that page, and use the Text Editor to access the embed properties by selecting the embed, right-clicking to open the context menu, then selecting 'Edit Embed' to open the Embed Properties dialog.
Table component
The Table component has two views:
1 - Configure Table: Is the normal 'running' mode providing access to set up Fields, configure maintenance and set-up Events consequent on Events, including Email, Twitter and LinkedIn status updates and external lookups.
2 - View Table: Allows you to enter data directly without going via a Data Entry Form. This is useful for administrative access.
The Behavior Editor of a Table gives access to multiple Settings controlling text and options, and the Permissions controlling who is able to create, read, update or delete records.
Table configuration
You will see that table construction and configuration is simple and intuitive.
Fields are added and Data-types set using the Table editor.
There are numerous data-types available, and you should take care to use the most appropriate type when configuring Tables - for example, using the 'Date data-type for dates, rather than just plain text will make other tools available during later construction.
Note
You will notice that the 'Book' Table in the example uses a Multiple-record Link to the 'Category' table. The system automatically manages the necessary intermediate table for you.
Each Table also has multiple text surfaces - the Record Edit View being the most commonly used in initial configurations. Although the Table does have a very basic inherent input-form capability it is normal to create input forms using a separate Data Entry Form component - one or more for each Table.
Data Entry Form
 The Data Entry Form is set up by selecting Configure Data Entry Form from the floating toolbox, and then selecting the Table it relates to from the drop-down selector. An [Edit] button enables you to drill down to the underlying Table.
Once you have selected the Table, create the customized user's view by selecting 'Edit text' then Record Edit View. Embed the Fields and Field Prompts (or use free text) using the Embed tool.
Embeds can be very easily positioned using the Text Editor HTML-tables tool, or you can can use DIV positioning if you prefer.
Queries
 The Query is a fundamental component of the system and understanding how to use it is a key skill. You should read about the Query and also the guidance on using Queries so that you understand how they work.
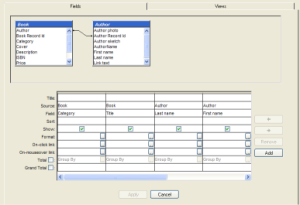
Queries allow you to sort, and select the raw information provided by the data feeds. It acts as the central connector marshaling the data stored in the site before it is displayed. The Query takes as its input one or more sources. Each source is recordset – it consists of records, each record containing fields. Regardless of how many input sources it works with, a Query will always output a single recordset (the 'resultset'). Much of the Query configuration is concerned with how several sources can be joined together to form this single resultset.
Query configuration is straightforward. You add Sources by right-clicking in the upper area of the Query dialog. The 'sources' are the Tables containing the data. You can join Tables by selecting a field in one source and dragging to the appropriate field in another selected source. It is possible to use the same field more than once in a Query.
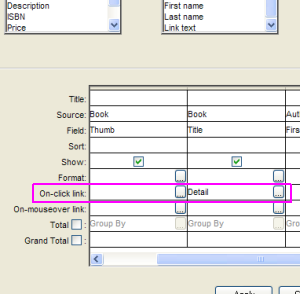
As you select source fields for inclusion in your Query they are added in the dialog and a number of controls are made available - Show (display the output), Format, Links etc.
Typically the On-click Link takes you to a Page where the output of another Query is displayed.
Custom Views
Regardless of how many input sources it works with, a Query will always output a single recordset (the 'resultset'). To be able to see the output you normally use a Custom View. The Custom View enables you configure exactly how you want the output to display. In the example 'Config' you will see that each Query has at least one Custom View.
Using the Custom View
The Custom View is used by embedding it on a Page. In this example you will see that each of the Pages in the 'Display' section of the example has a Custom View embedded on it.
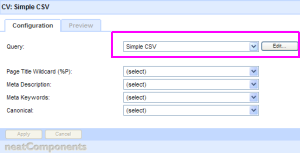
Custom View - set association
Select the Query that you want to associate with the Custom View from the drop-down, and then click the [Apply] button in the lower-left corner of the dialog. The [Edit] button gives you direct access to edit the Query associated with this Custom View.
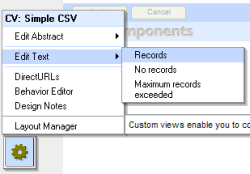
Custom view - select surface
Each view has three text-surfaces available to it. These allow you to display different content if there are exceptions - no results of the Query, or if there are too many results.
Normally you are working with the Edit text - Records surface - the surface shown when there are records to display.
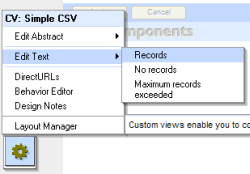
Custom view - embedding content
When you open the text-surface it is blank. You can directly enter text and images as with any text-surface, but you can also embed the output from the 'resultset' of the Query associated with this Custom View. Using the embed tool in the Text Editor you can embed Field Prompts and Fields to create your output display.
Types of View
 You will most commonly be using the Custom View on a Query in custom mode where you freely work with text, images and fields to create your desired display, as explained above.
However, there are three other 'pre-formed' views: CSV (comma-separated output), Grid and Query-by-Example. You see example usages of each of these in the Data Example download.
These 'pre-formed' views are display surfaces of the Query itself, and are configured from the floating-toolbox of the Query. These 'pre-formed' views are displayed by embedding them on the display surface as explained blow.
Displaying the View
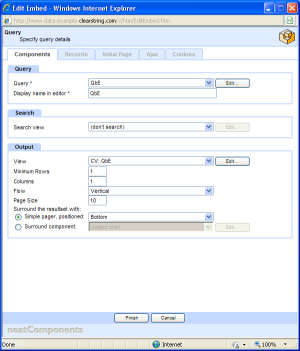
The 'resultset' is shown by embedding the Query on the Page set for display and then specifying the query details.
Method
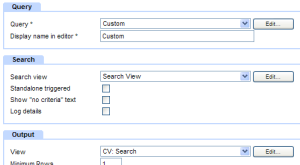
On the display page use the Embed-tool to embed a Query, and then when the Details panel opens (see left) set the relevant Query from the Query drop-down selector in the 'Components' tab.
The Search section allows the selection of a Search view.
The Output section allows you to select one of the Query's inherent simple views - CSV or Grid - or, more usually, to select the appropriate Custom View that you configured earlier (see above). The Output section is also where column and paging controls are specified for handling the display of multiple results.
Parameters and Criteria
Constructing the display
Examine the 'Display' section of the example.
The CSV and Grid examples are simple views that display all of the entries in the data set
The Query-by-Example and Custom examples show results that are restricted to matching a search result.
The Query-by-Example shows how to construct a search within, in the example, a book category. The results are displayed on the Detail page. When the Output is displayed as a result of the search they are restricted by Parameters so that only those records that match are displayed.
Display restricted by parameters
This is an important point. You will notice that the 'Detail' page is hidden in the navigation. It is not normally directly opened.
If you open that page from the Layout Manager you will see it displays all the records, however when you see that page in the normal way you see a limited set of results.
When the search is performed, the search function displays all the matching records on the same page. In this example in a 'Grid' view.
In the Query that this Query-by-Example is based on, the 'Title-field' is set to Show and be a 'On-click Clink' set to go to the 'Detail' page.
Using the [...] link-selector in the Book | Title, 'On-click Link' field allows you to set the Target-page where the output will be displayed.
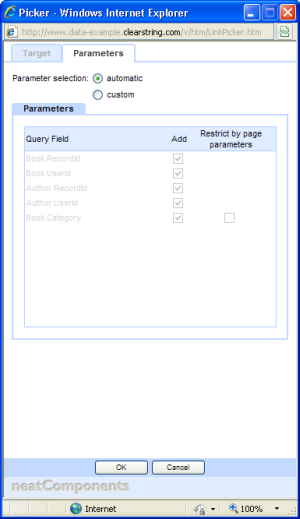
In this case it is the 'Local Page' called 'Detail'. The link-selector also allows you to set what parameters will be used to restrict the display. Selecting the Parameters-tab gives you access to the Parameter controls.
Set to Automatic
In most situations you will need to do no more than to allow the system to automatically set the Parameters. It will make a best-guess attempt, based on the Query, to restrict the display appropriately. In edge-cases, and where you are creating a specific display, you have full control over the Parameters in use.
Using Criteria
In addition to controlling the displayed output with parameters you can also set Criteria on the records that are available for display in this Query instance.
The Data-example does not use Criteria, but you can see from the display on the left how to apply them.
You can experiment with using Criteria and the other controls.
Ajax
The Ajax-tab give you access to the Ajax transition controls.
There is a simple Ajax-transition example on the Custom | Detail page of the data-example. Mousing-over the 'About this author' text will display the author's photo.
You can see how to construct the Ajax transition by following the example, and there is detailed configuration advice on ajax transitions here.
Search View
The Search View enables you to create more sophisticated searches over the data.
Configuration
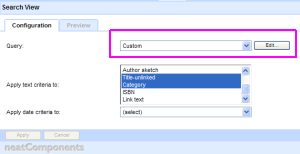
You must first associate the Search View with the Query that is to be used to marshal the data, just as we did for the Custom View. You should read about using a search View for background information.
 You will see from examining the example that the Search View uses the 'Custom' query.
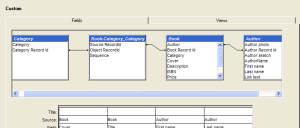
If you open that Query you will see how it has been constructed - linking Tables, and also using the same Field more than once. Take a few minutes to examine the Query. It is a good example of using queries in 'real life'.
The multiple-linked tables allow the Query - and so the Search View to see across all the content, so the user can search over all Tables - Books, Categories, Author. You will also notice that the system automatically created an intermediate source (Book.Category_Category as a result of the multiple-record link in the Book Table ) that is available to facilitate linking.
 Using the Search View
In this example the 'Custom' Query is embedded onto the page in the Display section.
It is set to use the Search View we just configured. The result of that search will be displayed on the same page using the layout defined in the Custom View (CV:) Search - which is also based on the same 'Custom' Query.
The user's selection from that search result (the linked result) goes to the Detail page.
 On the Detail page, the same 'Custom' Query is used again, but this time with the Output set to use the Custom View (CV:) Detail to yield the finished book page.
This completes the Configuration notes.
Additional Resources |
| Getting started with data |
Copyright © 2026 Enstar Systems Inc. All rights reserved |