| |
clearString neatComponents
| |
|
clearString neatComponents Enable SMTP Services |
| Installing | ||
Enable SMTP Services | ||
How to enable SMTP in Windows 7 & 8 and Windows 2008 - 20012
The SMTP service is normally added and enabled by default during the installation of neatComponents, and no further action is required.
Enable the SMTP in Windows 8 Pro
1 - Open the Windows Control Panel and select 'Programs & Features'
2 - In Programs & Features select 'Turn Windows Features on and off' in the left column.
3 - You will already have enabled the IIS services to enable the neatComponents installation, but if you have not done so already do that now.

4 - Also enable the ASP.NET services - Windows may ask to get more files from the Internet - accept.

When the feature additions complete you will be able to access the IIS SMTP control from the Windows Control Panel - Administrative Tools.
Note - this is an SMTP Service not Server. Emails must be sent to an operational SMTP Server for onward delivery. Suitable Windows Email Server Software is Mailtraq (fully supported), your ISP's mail server or Microsoft's Exchange Server.
Windows 7
A similar procedure is also used to enable SMTP in Windows 7. SMTP isn't included in Windows 7 by default. But you can install Remote Server Administration Tools that includes SMTP Server Tools for Windows 7 computers that are running the Enterprise, Professional, or Ultimate editions of Windows 7 or Windows 7 with SP1.
Enable SMTP in Windows 2008 and 2012
Details show Windows 2008. A similar procedure is also used to enable SMTP in W2012
1 - You need to ensure that the IIS Role is operational.
neatComponents enables IIS as part of the installation procedure. It is not normally necessary to make adjustments to this role.
If Web Server (IIS) is not present in the Windows Server Manager, select 'Add Roles'

2 - At the Add Roles Wizard, select Web Server (IIS) and follow the Wizard.

3 - When the wizard completes you can access the IIS Manager from Windows Control Panel, Administrative tools.
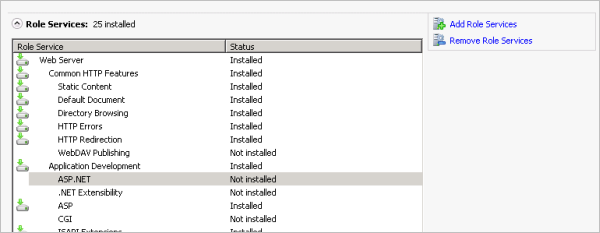
In the 'Web Server - IIS' Role Services dialog, add in (install by selecting and then Add) the ASP.NET Role Service indicated below - Windows may ask to get more files from the Internet - accept.
Restart the server. You should then see the SMTP service shown - see below.

Note - this is an SMTP Service not Server. Emails must be sent to an operational SMTP Server for onward delivery.
Suitable mail servers are:
Your ISP's mail server (configure like Outlook)
Dedicated email server software such as Mailenable or Microsoft's Exchange Server.
Gmal or MS 365 services
Installing and Support In this section |
|
Installing and Support
In this section: |
|
Copyright © 2026 Enstar Systems Inc. All rights reserved |