| |
clearString neatComponents
| |
|
clearString neatComponents Customizing Data Entry Forms |
| Application Development | ||
Customizing Data Entry Forms | ||
Introducing an important concept: The 'Source - Query - View' model
The example is a trivial one - but it will introduce you to the methods of data and display manipulation that are used in the most sophisticated of constructions. The 'Feed' brings data into the website, the 'Query' enables us to manipulate the data collected from the Feed, and the 'View' allows us to display that information on the website.
 In order to get you going quickly, we earlier used a special 'default view' feature of a Data Entry Form to get the form data into storage, but in reality you would be using the Custom surfaces of the DEF
Data Entry Form
The Data Entry Form surfaces can be styled in any way you like, using regular HTML methods.
The Data Entry Form component is designed to be exposed on the website and enables you to embed your form fields on a fully editable surface, where you can mix text and images and have full control over the exact position of form fields using HTML tables in the Editor, or using <DIV> positioning, or a combination.
Return to the Tutorial example DEF using the regular page navigation, and check you are still logged in. You'll see the list of Records you created earlier. We are going to change to a custom data entry surface that you can style as you wish
Configuration
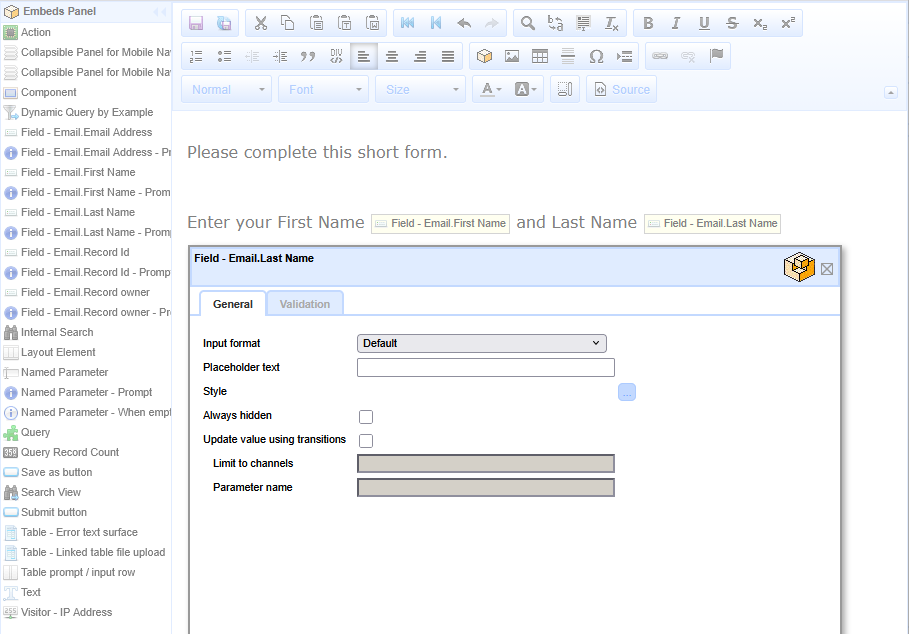
Mouse-over the Toolbox, and click 'Configure Data Entry Form', and then go to the Text Surfaces tab, and select "Record edit (custom)" (double-click or right-click, edit) in the tree. An empty Text Editor will open. This is the display surface of your Data Entry Form, where you construct what the form will look like.

Embedding Prompts and Fields

You can enter text and images in the normal way using the Text Editor and embed the Table-fields and Prompts using the Embed tool in the Text Editor. Selecting the Embed tool will launch the Edit Embed-picker where you can select the embeds you want to use. You can also drag and drop Embeds from the panel on the left of the window.
As you add embeds and intermediate Properties dialog will open where you can set Placeholder text and set Styles. You can access this dialog later by right-clicking on the field and selecting Properties. The Styles dialog opens the Styles Dialog and also gives access to the powerful Styles Theme system.

The Theme System is beyond the scope of this Tutorial, but it enables you to rapidly created styles and apply them uniformly across a complex app. You can learn more about the Theme system here, but come back to that later when you have finished this Tutorial.
Your page could look like this in edit mode:
Add the standing text and the Fields and adjust the styling to your taste.
Validation
You'll notice that in the Properties dialog for each Field you embed there is separate tab called Validation.
Validation is the process of ensuring that the data being stored contains values that are acceptable for the circumstances.
We are not using Validation in this Tutorial to simplify the work-flow, but you would use it in most circumstances.
You can read more about Validation here...
Remember to add your own Submit Button, and style it.
Turn off Validation for now.
Once the Data Entry Form is completed, we need to set the display to use it, rather than the simple Default surface.
In the Configure Data Entry Form mode, select the Text Surfaces tab and change the Record Edit mode from Default to Custom.
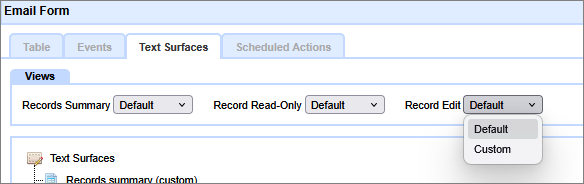
The state changes instantly without needing a Save action.
After the entry has been submitted, the visitor will be taken to the Confirmation page - previously set.
Alternatively, the Data Entry Form can display a page of its own to Visitors after they submit the form. This page typically thanks the Visitor for their submission and explains what happens next.
You configure this page by selecting Text Surfaces | 'Post Submission - displayed to users who cannot view record after submission'
Most 'advanced' components are hidden from visitors by default, so we need to change the View and Submit Permissions on this Table so that you can try it out as a pretend visitor to the site. So, in the Behavior Editor. Select Permissions - then select Visitor. Set the 'View Page' and 'Submit Records' checkboxes to 'Allow' and [Save Changes]. Close the Behavior Editor.
To see the form as a website visitor will see it use a different browser or a Private/Incognito session, otherwise you will need to log-out at the Admin section of the website - and then select the Email Form. Your form should look similar to this:
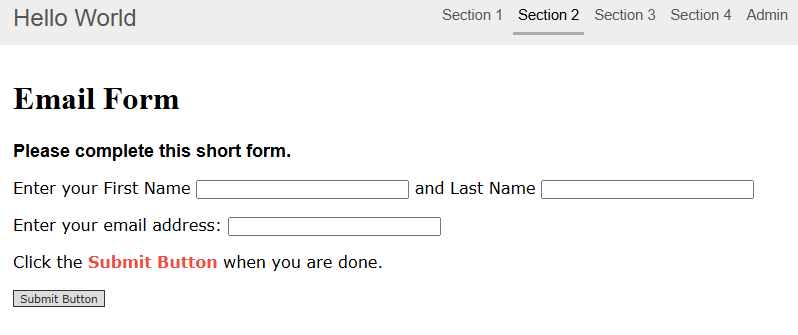
You may create multiple Data Entry Forms working against the same Table, and use the Permissions system to control who sees which Form. In this way sophisticated work-flow management systems can be created with minimal effort.
This is an important concept to understand.
![]() Moving on - using Queries to manipulate data
Moving on - using Queries to manipulate data
Below the line
More information
There is more information on configuring DEF Custom Surfaces here...
This example is just a quick and easy demonstration of the principles of configuring a simple data feed - in this case a Data Entry Form.
Real applications for Data Entry Forms range from collecting survey data from a web app on a Smartphone, to a web-page booking form to a custom e-commerce or social network application. And data can come into your system by fixed file-import or dynamic queries on external data-stores held by other parties, such as Amazon. Or via mobile devices using the camera and Bar or QR codes: camera input is a key part of business process flow management.
Page Title or Heading
You can control whether or not the Page Title (e.g. Email Form) is displayed in the DEF Behavior Editor.
.png)
Creating your first app In this section |
|
Creating your first app
We learn the basics of how to customize a Data Entry Form. In this section: |
|
 What are we learning here?
Copyright © 2026 Enstar Systems Inc. All rights reserved |