clearString neatComponents
| |
clearString neatComponents
| |
|
clearString neatComponents Data Entry Forms |
| Getting Started | ||
Data Entry Forms | ||
Data Entry Form
DaNext, replace the First Page in Section 2 with a Data Entry Form (ie delete the Page; add the DEF, rename it to Email Form). Thus:
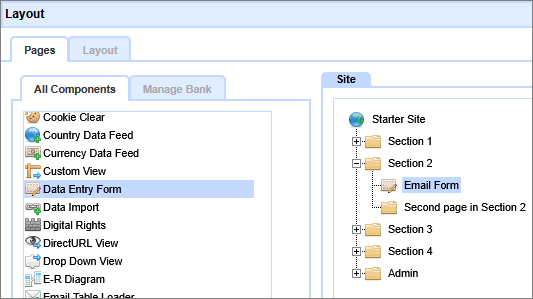
Return to the normal view of the Site, confirm the navigation has adjusted, then open the Data Entry Form.

Set the target table.
![]()
Mouse-over the Toolbox gear at the bottom of the page to display the menu.
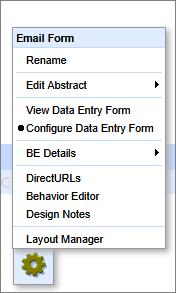
Then select the target table for the Data Entry Form. In this case use the 'Email' table you created earlier.

Then click Apply.
Return to the Toolbox menu and set the DEF to 'View Data Entry Form'.
Change the way the Data Entry Form displays
Once the table is completed we want to change over from the Configuration view to a normal view - the way a visitor would see it.
Method
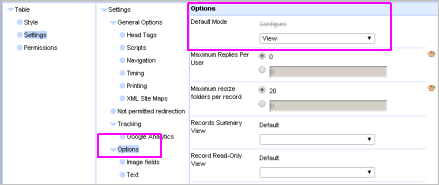
Open the Behavior Editor for the Table. Mouse over the Toolbox - select Behavior Editor. Then select Settings - then select Options. In the Options section, scroll down and locate the setting for Default Mode, and change the setting to View in the drop-down, and 'Save Changes' using the button at the bottom of the dialog.
Additional settings
1 - After the entry has been submitted, we want the visitor to be taken back to the Home page of the site. So, still in the Behavior Editor | Settings | Options,
go to 'Redirect target after record update', click to open the Picker.
Select 'Local Page', then choose 'Section 1'.
Click 'OK', and 'Save Changes'
2 - Most 'advanced' components are hidden from visitors by default, so we'll need to change the View and Submit Permissions on this Table so that you can try it out as a pretend visitor to the site.
So, still in the Behavior Editor. Select Permissions from the left-panel - then select Visitor. Set the 'View Page' and 'Submit Records' checkboxes to 'Allow' and [Save Changes]. Close the Behavior Editor.
Finally, mouse-over the floating Toolbox and change the setting 'Configure Table' to View Table'.
To see the form as a website visitor will see it you will need to log-out at the Admin section of the website - and then select the Table-tab. A more convenient alternative to logging out is to use a new 'incognito' or 'private viewing' window of your browser, or use a different browser. So construct using Chrome, and visit using Firefox, etc.
Your form should look similar to this:

You can try it out - make two or three useful submissions (we'll need them later) - then log back in and return to the Form. Each time you make a submission you should be taken back to the 'front page'.
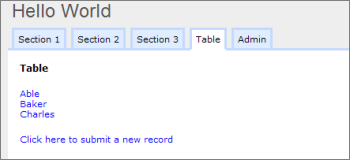
You will now see those records listed - neat, huh?
You will remember that when we set-up the Form we said: "Set the Record Identifier | Field to Last Name" - so the results are shown in Last Name order.
Please see note about 'Custom Forms' below.
![]() Now, let's see how to get the information collected by the Form emailed out...
Now, let's see how to get the information collected by the Form emailed out...
Below the line...
E.R Diagram
The Entity Relationship Diagram component (usually found in the Admin section of an app) makes it easy to visualize how Tables are related. This is a designer tool, not intended for viewing by app users.
Read more...
Advanced configuration information
1) When you are logged in you can still see the Form that you have created. Use the link 'Click here to submit new record' to view the page as a visitor would see it.
You can click on the record to Edit it, and the form behavior and results display are all fully configurable as mentioned below - but that is beyond this Quick Start introduction.
2) Custom Form creation - When you are working on a 'real' app you will want to have control over how forms are laid out on the page - where prompts, fields, standing text and graphics are placed. We are skipping that stage in this stage in the quick-start, but you can read about how to use Data Entry Forms for custom form creation here.
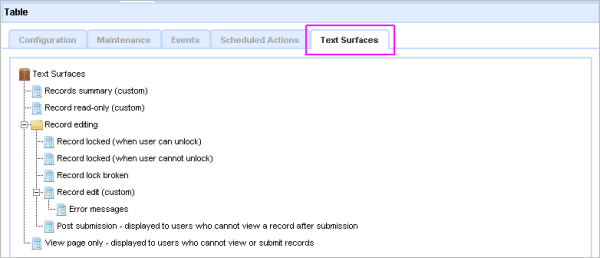
3) In a Table component, the Configure Table option gives access to the Form Fields and Events. The Text Surfaces-tab allows you to edit the page on which the Form is displayed, and the response pages automatically displayed on form submission. In the example below, locate (just hover over) "Record edit (Custom)". Right-click and click [Edit] to access the editable surface.
For example, if you want to configure the Form text area that visitors see, that is done in the 'Record Edit View'. And you can control just what happens after an entry is submitted - rather than just dumping the visitor back to the home page as we do in this simple example.
4)The Toolbox is context sensitive, and the options it offers depend on the Component being used.
The Behavior Editor | Settings | Options section allows you to configure the other form behavior.
5) You can configure the page that is displayed to ordinary visitors after the form submission from the text Surfaces | Post submission entry.
A first app walkthrough In this section |
|
A first app walkthrough
We learn how to add a basic DEF (Data Entry Form). In this section: |
|
 What are we learning here?
Copyright © 2026 Enstar LLC All rights reserved |