clearString neatComponents
| |
clearString neatComponents
| |
|
clearString neatComponents Table Joins |
| Getting Started | ||
Table Joins | ||
In this section of the Tutorial we are going to learn about using multiple tables in queries and how joins work.
Refactoring
The clearString neatComponents system protects you from the dangers of data loss that are inherent when manipulating database tables. You can safely make changes to your table structures as the following simple example shows.
Join Example
Working with the little data structure we have made so far, we are going to add a new field that allows categorization of the user information we are collecting. We will have three categories of user, Home, Business and Government. We'll create a new Table, present a user interface of a drop-down selector for each record, then join that to the existing Email table. We will adjust the existing Data Entry Form, which will demonstrate how to easily make modifications. Finally we will add a new Custom View to demonstrate that you can have multiple Views derived from one Table.
Method
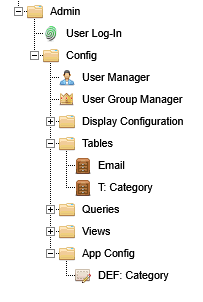
Add a new Table called T: Category
Add a new DEF called DEF: Category. This will only be used by the App creator or the App team, so create a new section in the Admin section called App Config and place it there.
Configure the Table with two Fields: Record Id and a Text Field 'Category Name'
Configure the DEF. Set it to use the T:Category, and Apply.
As this DEF is only going to be used for configuration by an admin we can simply use the Default surface.
Enter three records, one at a time: Home, Business, Government (Clicking the Gear Toolbox, 'View Data Entry Form' will take you to the data entry view).
We now have got the additional category information into our little app. Now we want to use it.
Modify the Table: Email
Add a new Field called Category and make it the Type: Record Link
The Edit Field view will change.. Set the 'Blank Option Text' to be "Select one..."
.png)
Select the 'Link to' tab, and link to the Table T: Category, selecting from the dropdown list of Tables.
Set the 'Text' and 'Sequence By' to be Category Name, selecting from the dropdown list.
.png)
Modify the Data Entry Form
Add some standing text and then embed the new Email.Category Field.
.png)
And Save.
Now when you go to the public view of the DEF you will see a dropdown list for Users to select.
.png)
You can Style the way the dropdown is displayed by opening the DEF to Configure it, then right click on the Embed and set the Style [...] at the General tab.
You can set the exact position on the page using the HTML-table tool in the Text Editor, or go into Source mode and directly enter <DIV> positioning.
Build a new Custom View
You can now build a new Custom View and embed it on a Page - let's use the First Page in Section 4
We will need a new Query - call it Q: Category.View,
and a new Custom View - call it CV: Category.View
.png)
Add them to the Config section as you did previously.
Configure the Query
You are now going to create a Join between the two Tables that you have created for this app.
Open the Q: Category.View in a new tab. In the Data Sources section, right-click and Add Source Email and T: Category
Bring all the fields into use in the Fields section of the Query. Note that you have two Fields called Record Id, so give the Record Id in the T: Category a Title to differentiate it. Click in the Title box and call it Category Id'.
.png)
Now using your mouse draw a line from the edge of the Source at the 'Category' line to the edge of the other source at the 'Record Id' line.
.png)
That line is the Table Join (technically an Inner Join) and allows the Query to access both Tables.
Now you can embed a new Custom View, based on this Query - as we did earlier - on a Page and you will see all the records and the categories listed.
This is fine as we only have a handful of records to view, however in most cases you are wanting to sort or extract information from thousands of records, either to display on screen, export as a CSV file or form the basis of a JSON Intersite Communication action.
To display the extracted data on screen you use a Query by Example Component to manage the display.
![]() NEXT - configuring a QbE - Query by Example
NEXT - configuring a QbE - Query by Example
Below the line
Working with Data
This Tutorial concentrates on teach you the basic methods for working with components, and so we are using as simple screen form to get our data. Online forms are important, but you can also import data in a number of ways. This enables you integrate with other systems and multiple methods of data acquisition.
Read about Data Integration and Data Import and Export here...
More about Joins
Each side of the Join can be controlled independently as well as the overall requirement for the Join
.png)
In addition to the Inner Join mentioned above you can construct a Left Join, a Full Join and a Cross Join (where no lines are drawn).
This example is joining two Tables, but multiple tables can be joined in this way.
.png)
You can construct a Union Operator by right clicking in the Data Source section and adding additional Source Group/s which are then Stacked and accessible to the Fields operations.
Validation / Matching
'Matching' is a form of Validation to make sure Users provide essential information. You adjust Join properties so that results will display even if some records are missing.
Visualizing Table and Data Feeds
The neatComponents platform provides an automatic dynamic visual representation of tables and feeds as an aid to managing complex data structures.
.png)
The Entity-Relationship Diagram (E-R Diagram) shows the tables and joins and although automatically generated it can be rearranged by the designer as needed.
Creating your first app In this section |
|
Creating your first app
We learn how to use Joins between multiple Tables. In this section: |
|
 What are we learning here?
Copyright © 2026 Enstar LLC All rights reserved |