neatComponents allows you to easily update your Twitter status at www.twitter.com
The Twitter Status Update is an action which can be added to components which support Events – for example the Data Entry Form.
Typical usage example You have a Blog, which is based on a Form, and every time you post a new blog entry, you would like the system to make a Tweet.
OAuth
Twitter uses OAuth as its authentication method. To use this you need to do two things:
- Register as an application with Twitter
- Configure an OAuth Consumer component in your site
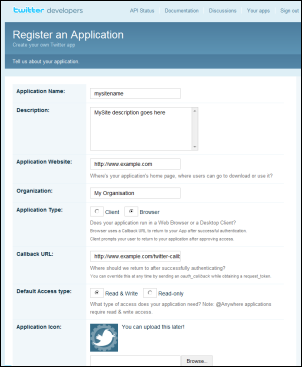 To register your site as a Twitter Application To register your site as a Twitter Application
- Browse to: http://dev.twitter.com
- Click the link to 'Register an App' and fill in the form.
- Application Name – choose a name related to your site or business
- Application Type – choose 'Browser'
- Callback URL – Your site domain followed by /v/nc/OAuth_Callback.nc (the domain needs to be https://)
- Default Access type – Read & Write
- Click 'Register application' and accept the Terms of service.
- You will then be shown your application settings. You can return to this page later via the 'View your applications' link.
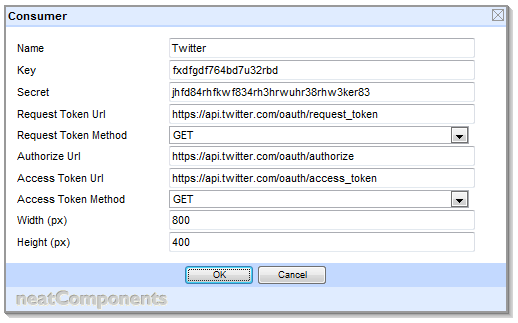
To Configure an OAuth Consumer component
- Use the Layout Manager to add an OAuth Consumer component to your site.
- In the component, click Add
- Complete the consumer dialog, coping values from your Twitter application setings page (be careful as the fields may not be listed in the same order):
- Name: Twitter
- Key: The 'Consumer Key' from your Twitter application settings page
- Secret: The 'Consumer Secret'
- Request Token Url: The 'Request Token URL'
- Request Token Method: GET
- Authorize Url: The 'Authorise URL'
- Access Token Url: The 'Access token URL'
- Access Token Method: GET
- Width (px): 800
- Height (px): 400
- Click OK and Apply to save the consumer.
Usage
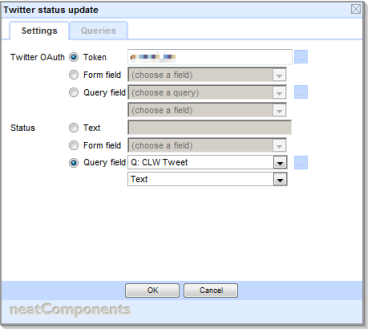
To add a Twitter Status Update to an event:
Go to the Events tab for the component, and right-click in the Event tree where you want the tweet action to take place, and select New / Action / Twitter status update
The New Twitter Status Update will be added to the event tree. Right click this, and choose Properties.
This shows the configuration dialog, which has two fields to configure:
Twitter OAuth – of the Twitter account
Status – the contents of the status update
The values for each of these can either be:
- entered directly in this dialog, or
- taken from a Form field – if the component is a Data Entry form or Form, or
- taken from a the first record returned by a query, defined on the query tab of the dialog.
Tip: For a simple scenario, enter the Token directly in the dialog, and take the Status from the Form
OAuth Tokens
The OAuth token takes the place of the more traditional Twitter username and password. When configuring a Token you will be asked for your username and password, which you enter into a page hosted by Twitter. In this way Twitter users can allow your site to make posting to their Twitter account, without divulging their username and password to your site.
To configure a Token
- Click the [...] against the Token field
- Click Add
- Enter a name for the Token. Typically this will be the name of the Twitter account where the status update will appear, but you can enter any name you like. You must enter something.
- Choose the Twitter consumer, and click Next
- Acknowledge any mixed-mode security certficate warning the brower shows (a known Twitter buglet that doesn't matter)
- Twitter will display a dialog asking you to login (if you aren't already logged in to Twitter) and to Allow the access.
- Click Allow.
- The Token will now be listed in the dialog.
- Click OK to use it.
Token errors
If your Tweets are not showing up when you expect (allowing a few minutes for Twitter to process them) it may be that your Token is invalid. To check this, open the Token dialog (as if you were going to add a new Token). If there is a problem with your Token it will show a yellow warning icon. Hover over the icon to see the error returned by Twitter.
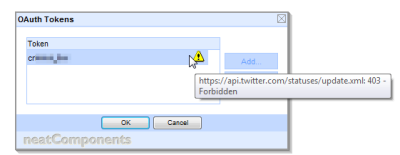
The system will still attempt to send future tweets using the Token even if it received an error the last time it was used, in case the error was a result of a transient failure at Twitter. A successful tweet will clear any pre-existing alert icon from the Token.
As Twitter is designed as a realtime service (unike, say, email), the system does not queue failed Tweets for redelivery attempts.
When are Tweets sent?
Tweets are sent when configured – ie immediately upon the Form is submitted, or after a delay if you have configured one in the event tree.
- Tweets may take a minute or two to show up on Twitter.
- If Twitter is offline and unable to receive the Tweet, the system will retry every ten minutes until it is received.
- If Twitter refuse the message – for example if invalid Username and Password details are given, the Status is empty or it is a duplicate of the previous Tweet, it is silently discarded.
Sending multiple Tweets
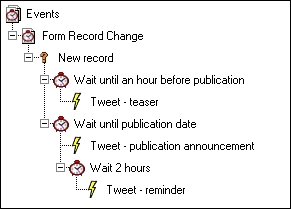 You can configure an event to trigger multiple Tweets to be sent. Simply add multiple Twitter Status Update actions to the event tree. Unless you want them all to appear at the same time you should separate them out with delays. You can configure an event to trigger multiple Tweets to be sent. Simply add multiple Twitter Status Update actions to the event tree. Unless you want them all to appear at the same time you should separate them out with delays.
Content truncation
Tweets are limited to 140 characters, including spaces. The system will truncate longer tweets to this length, however as this may compromise the meaning or break links, you should ensure the content is not too long.
| 
