| |
clearString neatComponents
| |
|
clearString neatComponents External Sale Connector |
| Application Development | ||
External Sale Connector | ||
Introduction
There are many situations where you want to allow a third party website (a ‘Vendor’) to sell your products, taking the payment from the customer (the 'Purchaser'), and then you provide the product. This could be a drop shipping relationship, or one where they are acting as a reseller and you ship via them.
Whatever the specifics of the business relationship, there are several technical challenges to manage:
- Provide the Vendor with your catalog so they can display it on their site.
- Get notified by their site when they sell one of your products – so you can adjust your stock control and supply the item.
- Keep account of how much the Vendor owes you for the items they have sold.
The External Sale Connector component acts as the hub that provides the interface between your site and the set of third party vendor sites. The third party sites can be created using this software, or any other system, so long as they connect using the defined API.
Method
First set up your site to sell directly to customers. This will ensure your e-commerce systems are working fine before adding in the complexity of third party sites. (If you don’t intend to sell direct, you can always hide this functionality later.) In setting up your e-commerce system you will have one or more of the following components:
- Tables – to store your product data
- Queries – to pull out the products you want to sell
- Sale Views – to define which fields are to be used for description, price, etc
- Shopping Cart – to collect all the information about the purchase, and produce a set of records that can be seen by the Order Data Feeds
- Order Data Feeds – (including Order Item Data Feed, Order Payment Data Feed, Order Charge Data Feed) to allow reports to be made showing what has been purchased.
With all the above working together to provide an e-commerce system within the site, the External Sale Connector is added to allow the external sales.
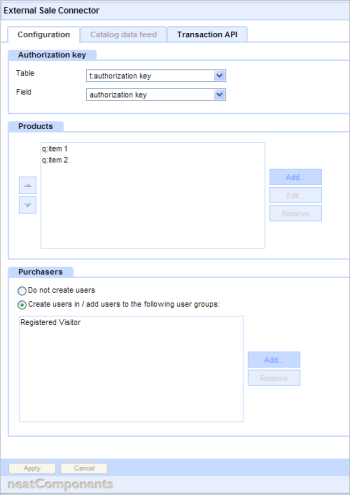
There are three tabs on the External sale Connector:
- Configuration – to enable you to set it up
- Catalog data feed – to show Vendors a preview of the feed, and give them a link to download it
- Transaction API – to show Vendors how to register a sale
Configuration
There are three main aspects to configure:
Authorization key
This determines who is allowed to be a vendor, and enables the system to verify that a sale was valid and made by a vendor.
Add a new Table to the site, called say ‘Authorization keys’, and configure it with an “Installation Id” field to be used for the key.
In the Table, create a record for each Vendor. The vendors should be added as Users to the site, and each record set to be owned by the relevant vendor.
Products
In this section add the products that your vendor will be able to sell. Select the Query and the Sale View. Add any criteria to restrict the products: these can be generic restrictions (to prevent sale of items that are not yet released, etc) or specific to the particular vendor (by using Current User in the criteria)
Purchasers
In this section you can specify whether the purchaser (ie the person buying from your vendor) should be added to the site as a User, and if so, which User Groups they should be added to. If they already happen to be a User on the site, they will be added to any specified User Groups. As a new user, they will be emailed a password, which they can then login with and change as usual.
Behavior Editor
In the Behavior Editor there are some more Settings to consider:
The Purchase access Type determines whether the vendor needs to simply include their Authorization key with the purchase request, or whether they should send an MD5 hash. (The latter provides more security against fake purchases should their key be compromised, but may be harder for the vendor to implement on their site.)
Vendors will already have been created as Users in the system, but it is possible they do not yet have an account set up in a currency they are selling in. If this is the case the component will create an account for them, which will be debited with the transaction value. If you wish to restrict the volume of sales by setting a credit limit for the Vendor, you can set these limits here: these are used as defaults for the new Vendors: you can then go in to the Account component to edit these values for individual Vendors. Reaching a credit limit will cause a transaction to fail.
Catalog data feed
This tab shows the Vendor a preview, limited to the first 10 records, of the data feed available to the Vendor. If your feed criteria are sensitive to the Vendor identity, then the preview will similarly show different results depending which Vendor you are logged in as.
The feed is a CSV format file, with four columns:
- Sku – a unique reference for the item
- Title – the name of the item
- Price – the price charged to the Vendor (the Vendor should add on their margin before presenting pricing to their Purchasers)
- Description – the description of the item
The Vendor should note the first row gives the column names, and should always reference that, as to support new features new columns may be added, and the sequence of existing columns may change without notice.
Below the preview a link is given to the feed itself. This contains the Vendor’s authorization key, since the Vendor’s website is not expected to login to the website first.
The Vendors should be encouraged to schedule a periodic fetch of the data feed, and then cache it for use on their site. They should not, for example, fetch the feed every time one of their customers visits their site, otherwise there is a risk of over-burdening your site. Conversely, they should not leave it too long between fetches, or they will not become aware of changes to your catalog, which could result in missed sales opportunities or transaction failures should they attempt to sell items no longer on offer. The schedule you recommend will depend on the nature of your site, but somewhere between hourly and daily would be reasonable.
The vendor should be advised to keep their authorization key secret, since it is used to prove that a transaction was made by them.
If their authorisation key gets compromised, you can provide them with a new one, by deleting their record in the Authorization table, and creating a new record owned by that Vendor. They will then need to use the new key in both their requests for the data feed, and when they register their transactions.
Transaction API
This tab shows the Vendor an example transaction notification request.
The expectation is that the purchaser buys the items from the Vendor’s site (possibly with items from other sources at the same time), and once the Vendor has received payment the Vendor notifies your site by Posting an XML file to the URL shown.
Normally this will result in a response showing the transaction was received successfully.
Transactions are either successful or unsuccessful: they are never partially accepted.
If there was an error, then the response will detail the nature of the problem. The Vendor should then react accordingly (for example, if they have exceeded their credit limit, they should pay you; if they have attempted to sell an item that is no longer for sale, they should refund the purchaser for that item, remove it from the request, and resubmit)
After a successful transaction submission the system will store this in the order database.
This will normally be as a single transaction, but if required it will split it into several transactions: this may be because there are several currencies involved, there are conflicting delivery schedules for the items, or the items are configured by the Sale Views to use different Shopping Cart components.
Once stored in the order database, this will then trigger the order processing emails, just as if the order was submitted through the local Shopping Cart component. When configuring the emails, note that you do not know how much the Purchaser was charged, so should not include pricing information.
If so configured, the system will create the Purchaser as a User on the site, and will email them with a temporary password so they can login. (They may wish to login if you are providing digital downloads, or if they want to see order tracking data, etc)
Copyright © 2026 Enstar Systems Inc. All rights reserved |